Showing posts with label editing. Show all posts

Wednesday, December 26, 2012

Christmas Moon Photo

I hope everyone had a wonderful Christmas!  I got one of the things I really wanted: Photoshop Elements 11!  I have been using Lightroom 3 for my portraits and everyday shots, Picasa for quick editing when all I need is a watermark or a slight tweak, and GIMP for actual cut and paste editing.  I had tried PSE before in earlier versions and found it confusing and hard to use.  GIMP is very technical and I had some stuff figured out but even the help files can be rough.  Picasa is fun and cool but limited and instagrammy.  Nothing wrong with that but it only takes you so far.

I was impressed with PSE11 immediately.  The user interface (UI) is simple and based on common sense.  The terminology is easy to follow and there are links to help files all over the place.  The help files themselves are also simple to understand and actually answer your questions instead of causing more!

For instance, it took me about an hour to create this photo in GIMP:


I cut the moon out of another photo using the "Paths" tool.  This is painstaking.  I had to click every centimeter or so around the outline of the moon in order to try to get it to come out without any black edges and then figure out how to select the path that I had made (took 2 tutorials to get to the root of it, and they were outdated so it actually wasn't useful info) and then I skewed it so that it was the size I wanted.  Next I had to frig with the levels, the hue/sat, and the contrast to get the color tones correct.  Next came a tutorial I had to watch to figure out how to export the file properly.  Once I had exported it and went into Picasa to put my watermark on I ran into another problem.  The file was a .jpg but it kept saying that it was locked or not available when I would try to save my edits in Picasa.  Turns out that there is something wrong with how GIMP's new version saves the metadata.  After searching through Google file after Google file I finally found out how to fix it.  I had to go back and re-export it from GIMP and uncheck the "Optimize" and other boxes that were pre-checked so it just exported the file with no added data.  What a pain!!!!  But I'm a cheap Scotswoman so I was just dealing with it for the free program.  Oh and when I downloaded GIMP in the first place it put some adware on my hard drive that my virus scanner had to kill.  Nice.

This next photo was edited using PSE11 last night.  It took me about 30 min to figure out and apply the edits that I wanted to get this final result:


I used these two photos to make it:

f/22, 1/30 sec, ISO 800 using 300 mm lens at 300 mm

f/4, 2 sec, ISO 1600 using 70-300 mm lens set at 70 mm

What I did was use the smart lasso tool in PSE and capture the moon.  Now, the moon is not quite full so I had some trouble with that lower left corner where its darkest.  I had to go into the "Refine Edge" option and shrink my selection area to exclude the darkest bits.  After that I just adjusted brightness to make it so it was almost bright as the original but you could still see the crater shadows just enough so that it was realistic.


Then I got a challenge to add a moon to this photo:


Its a photo of my parents' house in Westford, VT.  I did a long exposure of 6 seconds at f/8 and 1600 ISO. I removed the noise caused by the long exposure and the high ISO in Lightroom 3.  The moon was behind me as this photo was taken at 6:22 pm facing West.  I used the same moon photo as above (the one with the black sky) and cut the moon out in the same way.  Next I shrank it manually using the little boxes that around surrounding the selection of the moon.  I moved it where I wanted and then did the same "Refine Edge" option but since my sky is darker here in this photo I didn't have to shrink my selection as much.  I then used one of the layer filters Hard Light blend mode on just the moon and it gave it the right contrast and coloration that I was looking for.  The final result is this:


I wasn't completely happy with how it looked right out of the PSE gate so what you also see here in the above photo is my use of Picasa's HDR-ish filter with radius and strength slider almost all the way to the left and slightly faded into the original, and also a slight Orton-ish filter used to "bloom" the highlights and deepen the colors.  The end result being slightly surreal but pleasant.

I am looking forward to learning more about this program and hopefully creating some more moonscapes!

Thursday, March 10, 2011

Quiet Down!

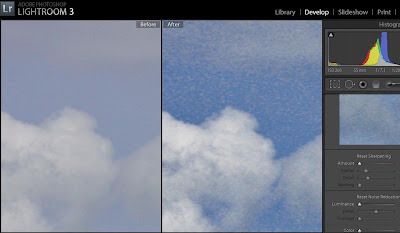
One of the things that can ruin a great photo is noise. I hadn't heard the term until I got the DSLR and read some how-to's on dealing with a high ISO setting in dark lighting. Anytime you take a photo with a digital camera without the proper lighting you are going to encounter this problem. The only program I have found (doesn't mean there aren't others out there...) that deals specifically with this problem is Lightroom. Picasa doesn't have an algorithm to deal with it, and I assume it was probably time consuming to invent. SO you must pay but wow is it worth it! Below are some before and after shots of noise removal from photos of clouds, which let me just say are some very noisy subjects due to their...mushiness!


There are 2 kinds of noise: color noise and grain. Above in the "Before" section you can see tiny dots of purple and green and magenta in the blue sky. A great article explaining why this happens can be found here!

The "After" image shows a speckly looking sky. I have removed the color noise and upped the Luminance of the purple hue, but what is left is quite ugly! That is what I call "grain noise".

Above you can see that I have slid the Color bar over to about 30 (30% of the pixels). In LR3 you do not need to slide that particular bar over very far to get a good result. In fact if you slide it too far you may lose some of the color you want to keep! 30 usually is sufficient.

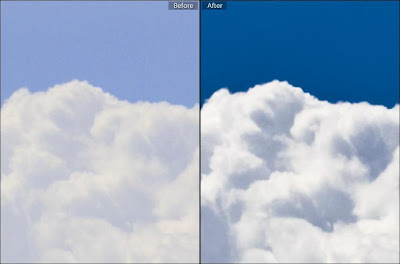
And here in the above photo is another example of noise that is present when trying to enhance the contrast of the image to make the clouds pop, but having unpleasant after effects.

So, what can we do about this grain noise? In LR3 there is a section under the Noise Reduction menu called Luminance. Luminance is what makes the skin on those models you see in magazines look flawless. It gives the photo enough blur to instill perfection without compromising the integrity of the original subject. However you do not want to be heavy handed with it as too much of a good thing can spoil the result.

Here is an example of a finished photo using both color noise and luminance noise reduction:

The after image also had gone through the same process as the ones earlier in this post. I had upped the contrast to about 60, darkened shadows, brightened highlights, and adjusted blue luminance (under the hue/saturation/luminance menu) which caused graininess. Using both the color and luminance noise reduction sliders I was able to obtain a smoother, more pleasing image.

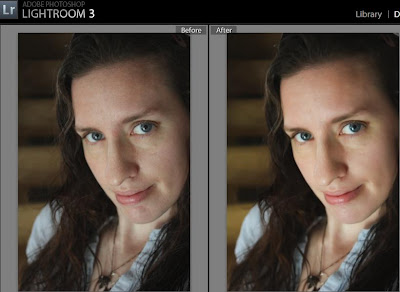
Here is an example of a photo of a person (Ok, its me, and I can't believe I am putting my blotchy skin out there but its in the name of photography!!!) just so you can see the difference in something non-cloud (I tend to be obsessed with clouds so they become my main subjects!)

Here using the Luminance Noise Reduction set to about 50 you can see that the skin tone is much more even and blotchiness fades away. Any more would make it too blurry, and any less would leave too much grain. This photo was taken in a dark stairwell using the camera set on "No Flash" which is an auto setting. I like this setting for some things because it makes the most of available light and creates a warm feeling to the photo.

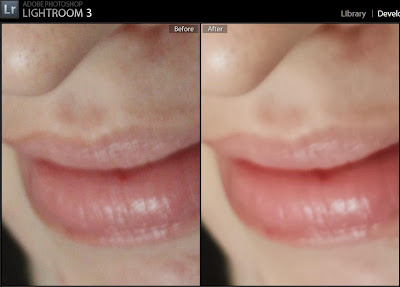
Here in this closeup you can see the purple/magenta/green dots on the left, as well as some blotchiness. Using these techniques can create a smoother complexion on a person without having to retouch every little spot.

I hope this was helpful to someone! The more I play with Lightroom the more I am learning. There are tons of forums and help files but I haven't got the attention span or the time to read them all. If I spent all my time reading that stuff I wouldn't have time to actually edit my photos!!!