Showing posts with label lightroom. Show all posts

Thursday, June 21, 2012

Lightroom 4 Review

As some of you know I am a huge fan of Lightroom.  My friend mentioned it to me when I first got my DSLR and I do not know how I would exist as a photographer without it.  Especially since I do a lot of outdoor photos where the sunlight can be overwhelming, and also indoor events where I need that extra boost to remove noise and lighten without losing quality.  I have been using Lightroom 3 for about 2 years now.  I first started using it when it was still in Beta form, and then received it as a Christmas gift once it was live.  You can imagine my excitement when Lightroom 4 was announced!  New means better, right?  I downloaded the trial last week and started editing right away.

Here is an example of a what I was working on in Lightroom 3:


The sliders I find most useful on the right there are Recovery, Fill Light, Clarity, Vibrance, and Blacks.  These are great for correcting over and underexposure.

Here is an example from Lightroom 4:


Missing are the Recovery and Fill Light bars.  This really makes it hard for me to get the same result I could easily get with LR3.  Replacing those two options are a second set of tonal controls: Highlights and Shadows, and also a new slider called "Whites" that barely does anything, at least in a low light photo.  The blacks slider used to really bring out the black pixels and you would only slide up to maybe 5-10 as it was very sensitive, but the new version you slide the opposite direction and can go to a value of -30 and very little seems to happen.  I keep looking for the fill light and recovery slides!!!  Whites does not fill light.  Exposure now also seems to do something different.  It used to just bring up the exposure of things that were already exposed.  What I mean by that is if you look at the first ballerina photo from LR3 you can see that the ballerinas became lighter when I raised the exposure, but the background actually stayed fairly dark.  That's what I used fill light for, to let me control how much the background would lighten.  Now in LR4 the exposure seems to lighten everything at the same time!  Not liking that!  I find that I now need to use the brush Adjustment Brush for everything (at least in the darker ballet photos) so that I don't overexpose the entire picture!  

Speaking of the Adjustment Brush, that is the one feature that so far I like better than LR3.  If only I could meld the two versions together and pick and choose what I want.  Here is a side by side comparison of the Adjustment brushes, LR3 vs LR4:


I love that I can control the temperature of just a part of the photo.  And also the noise and tones.  But I'm not sure that its a fair trade.  

In conclusion, I don't think I will be scrimping and saving to puchase the upgrade to LR4 anytime soon.  Its $79 and I would rather use that money towards a lens or filter if I had it.  I am not knocking the product exactly, but I have to say I was a bit disappointed.  I am sure there are ways to "recover" and "fill light" in LR4 but they cannot be anywhere as easy as they had been.  I also do not have the time to sit and watch tutorials on how to use it seeing as I already spent a lot of time watching the LR3 videos!  


Thursday, March 10, 2011

Quiet Down!

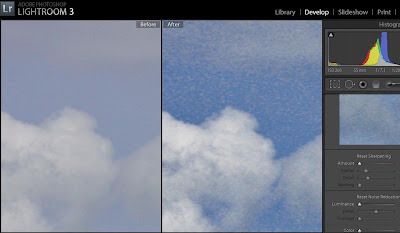
One of the things that can ruin a great photo is noise. I hadn't heard the term until I got the DSLR and read some how-to's on dealing with a high ISO setting in dark lighting. Anytime you take a photo with a digital camera without the proper lighting you are going to encounter this problem. The only program I have found (doesn't mean there aren't others out there...) that deals specifically with this problem is Lightroom. Picasa doesn't have an algorithm to deal with it, and I assume it was probably time consuming to invent. SO you must pay but wow is it worth it! Below are some before and after shots of noise removal from photos of clouds, which let me just say are some very noisy subjects due to their...mushiness!


There are 2 kinds of noise: color noise and grain. Above in the "Before" section you can see tiny dots of purple and green and magenta in the blue sky. A great article explaining why this happens can be found here!

The "After" image shows a speckly looking sky. I have removed the color noise and upped the Luminance of the purple hue, but what is left is quite ugly! That is what I call "grain noise".

Above you can see that I have slid the Color bar over to about 30 (30% of the pixels). In LR3 you do not need to slide that particular bar over very far to get a good result. In fact if you slide it too far you may lose some of the color you want to keep! 30 usually is sufficient.

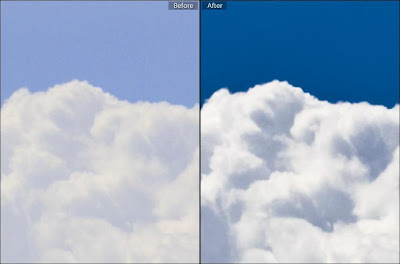
And here in the above photo is another example of noise that is present when trying to enhance the contrast of the image to make the clouds pop, but having unpleasant after effects.

So, what can we do about this grain noise? In LR3 there is a section under the Noise Reduction menu called Luminance. Luminance is what makes the skin on those models you see in magazines look flawless. It gives the photo enough blur to instill perfection without compromising the integrity of the original subject. However you do not want to be heavy handed with it as too much of a good thing can spoil the result.

Here is an example of a finished photo using both color noise and luminance noise reduction:

The after image also had gone through the same process as the ones earlier in this post. I had upped the contrast to about 60, darkened shadows, brightened highlights, and adjusted blue luminance (under the hue/saturation/luminance menu) which caused graininess. Using both the color and luminance noise reduction sliders I was able to obtain a smoother, more pleasing image.

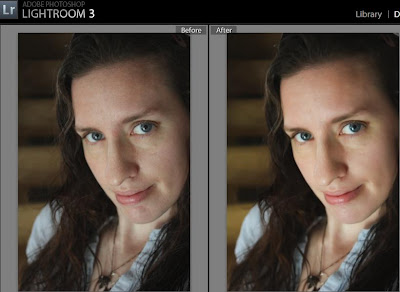
Here is an example of a photo of a person (Ok, its me, and I can't believe I am putting my blotchy skin out there but its in the name of photography!!!) just so you can see the difference in something non-cloud (I tend to be obsessed with clouds so they become my main subjects!)

Here using the Luminance Noise Reduction set to about 50 you can see that the skin tone is much more even and blotchiness fades away. Any more would make it too blurry, and any less would leave too much grain. This photo was taken in a dark stairwell using the camera set on "No Flash" which is an auto setting. I like this setting for some things because it makes the most of available light and creates a warm feeling to the photo.

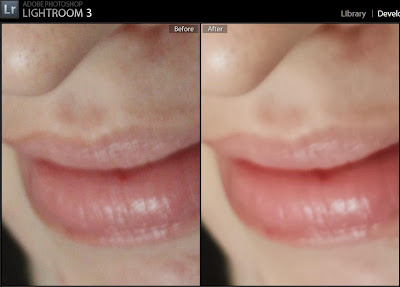
Here in this closeup you can see the purple/magenta/green dots on the left, as well as some blotchiness. Using these techniques can create a smoother complexion on a person without having to retouch every little spot.

I hope this was helpful to someone! The more I play with Lightroom the more I am learning. There are tons of forums and help files but I haven't got the attention span or the time to read them all. If I spent all my time reading that stuff I wouldn't have time to actually edit my photos!!!

Friday, June 11, 2010

Lightroom--Vive l'difference

I have had the Lightroom 3 Beta download on my computer for about 3 months now. It intimidated the hell out of me so I never really did much. Then I took this picture the other day:


Looks pretty cool, right? I used Picasa and hit "I'm feeling lucky" on a close up of a rainbow that passed through the other day. I was excited that I could see the rain falling through the colors and that you could see the extra bands of coloring under the traditional ROYGBIV.

HOWEVER you will also notice that it is noisy as heck. "Noise" is the graininess you can see, the little dots of brighter colors that make it look kind of like a close up of a cartoon in the newspaper. Not pretty. If you are picky about your photos like I am, this will bother you no matter how cool it looks!!!

Lightroom (from Adobe) has this cool feature called Noise Reduction. I had heard about it but was too scared to figure it out. Never be scared of a computer program in this day and age. There are so many help files and tutorials out there that anyone can do anything if they just take the time to read the how to!!!

Here is the same photo using noise reduction:

I was very happy with this result. There are still some issues that cannot be completely resolved using just the noise reduction, but it looks many times better and preserved the 2 things I liked about the image in the first place: the rain drops and all the colors!

Lightroom 3 is now available to purchase so the beta is no longer available. I am not sure if at some point its going to die on me completely, but the good thing about software is that they are always working on the next version and that one will be in beta also! Visit the Adobe website to purchase this wonderful program! If you have a student at home, the cost is drastically reduced so check that out for sure!!