Friday, October 15, 2010

Shooting Foliage

Lake Arrowhead, Milton, VT
As you may or may not know I live in Vermont. One thing we are known for here besides farming and Maple Syrup is the amazing foliage our Green Mountains have on display every year. Most years I have not even really stopped to take stock in how gorgeous it is or how many photo opps I had. I am afflicted with S.A.D. and it always kicks in this time of year.

Always, that is, until this year. Having this DSLR camera and the capability to express myself artistically in a way that fits my lifestyle (i.e. 2 schoolies and a 1 year old) has done amazing things for my depression. It gets me out there, it gets me thinking of new ways to look at things, and it distracts me from my demons. Even if no one will ever see the hundreds of thousands of photos that I have taken over the past few years and into the next part of my life at least I have one more day here on this Earth.

OK enough about me. Let's get to the foliage! Well since I have had several absolutely breathtaking days to get out with my camera and the stroller (or the baby hiking backpack) I probably took about 1200 photos. Not kidding. Of course I whittle them down to several hundred, and ultimately share about 250. One of the issues I ran into was the positioning of the sun's effect on what my camera chose to wash out. If the sun was behind me, great! The sky came out this vivid blue and the leaves were their brightest orange, yellow, red, and green.


BUT if the sun was in front of me at all, or to the side, it would wash out the sky and make the leaves look dark and yucky:


You can see by the upper left that the sky is blue with some clouds in it but let's be honest, this picture is kind of blah.

What is happening is the camera metered the amount of light it would need based on the darker tree, which in turn caused the sky to be overexposed. There is something your camera does called White Balance. Most cameras, even the one on your phone, have a way to adjust it. Auto white balance is good for beginners, or if you had a sunny day like this one you would set it to Sunny. Also you can try dialing the exposure compensation down a few notches which would tell the camera to take in less light data. Another thing to try is to quicken the shutter speed, and/or tighten up the aperture a bit. It will take some playing around to get it just right. The photo below is an example of the Aperture at F11 and the Shutter Speed at 1/1000 of a second. Oddly enough, I accidentally left the ISO at 800 which normally would have overexposed it but the shutter speed was so quick it didn't matter. It may have had an even darker blue sky if I had set it to 200 like I should have!


Wednesday, October 6, 2010

Overexposure!!!

I was lucky enough to do an 11 person family portrait over the last weekend. It is fall here in VT and it has been super rainy. We had hoped to do it by a picnic area locally but this is what it looked like after we got 4" of rain in one day:

From Flood!!!!


Yikes!! So we had to nix that idea. Luckily the backyard of the family has a nice tree line so we were able to utilize the space there and creatively so! The owner has a daycare so there are lots of fun play structures in her fenced in yard but we were able to work around them and also use them as "props" for a few pics!

The problem, and the reason for my post's title was that the sun came in and out that day. It was a gorgeous day don't get me wrong, but we did the session at noon and there were lots of little clouds going over the sun and then leaving. Direct sunlight at high noon even in the fall is a little hard to work around when taking photos of people. You want them to come out natural looking, not pasty ghosts!! I found that when the clouds would cover the sun they came out great, but then all the sudden I would be snapping away and BAM the sun would blaze down. Sadly some of my best poses (you know, the ones where everyone was actually looking at the camera!) happened during these times of brightness. My camera was set to handle the cloudiness so those came out washed out looking. How do I fix it? I can't afford the fancy photo editing software at this time so I am using Picasa for all my needs. Picasa doesn't have an obvious exposure fixer at this time. These are the options for "Effects" editing:


Lots of fun stuff, but how do I fix a photo like this:


I scratched my head and even wanted to cry for a minute. This family is rightfully expecting their photos to look professional. I am a perfectionist and I also am afflicted with clinical depression. One way I have found to deal with both these issues is to try things that perhaps no one else would try. Sometimes those are the things that work the best. I clicked on several of these effects to see what would happen. I am not afraid with Picasa because things are so easy to reverse and the program saves a backup of your originals automatically.

The last one I tried is the one in the bottom right hand corner called Graduated Tint. It's description says "Useful mainly for skies". Well, there are no skies in my photos but let's see what happens anyhow.


Voila! It worked!! I kind of like how Picasa doesn't hold your hand completely through everything (perhaps they don't know all of the program's capabilities in every instance anyhow...it IS a Google program and they like you, the user, to explore!) so that you can make these reaffirming discoveries on your own.

The trick to using Graduated Tint is not to touch the color palette at all. Simply click on the icon, then use the "Shade" slider moving to the right to darken the exposure until it looks halfway normal.


You will also notice a target in the center of your photo.


What I did with this was drag it all the way down to the bottom of the screen to give the entire picture an even exposure change. The purpose of the target really is for skies. If you have a horizon line like this:


You see how the way the camera metered the light was based more on the darker lower half of the screen where the land and trees are. The sky looks washed out. This will only work if you can see SOME color in your sky. If you have one of those completely whited out skies it will really not help at all. What you do is put your target just above the horizon line and then start sliding the shade lever over. You will see the colors in your sky look more and more natural. Make sure you don't over do it though or it will look freaky. Then use the other slider, the Feather slider, to blend the bottom so that it looks like you never did a thing ;)

(Note: I also used the Shadows tool to bring out the colors in the trees, and the straightening tool to turn it slightly which removed the telephone wire in the upper right corner! Told you I am a perfectionist lol)

I hope this was useful for someone out there! I know it saved my butt :)

Friday, September 3, 2010

Aperture: Wide vs. Narrow

One thing in photography that intimidated me was Aperture. The word itself seems scientific and foreign to me.

One thing I have tried to do in my life since Kindergarten was to understand those things which scare me. I have done it with math, physics, spiders, and now the inner workings of a camera. I'm not claiming to be a genius in all these subjects but I feel that the best way to get over feelings of self doubt and ignorance is to face something head on that scares the crap out of you.

OK well enough life lessons, let's get to the Aperture!

Basically what I have found is that the wider the Aperture (which means its letting in more light as a whole) the blurrier the background is (which can be very pleasing) and the smaller the Aperture the more in focus the background is. I spent some time pondering why exactly that is. To some people with a logical brain the answer may be obvious. But I am an abstract thinker so it takes me a few minutes :)

Here is an example of a wide open Aperture on a sunny beautiful summer day:


Notice that the Goldenrod in front is sharp and crisp and the stuff in the background looks kind of mushy and soft.

Now here is an example of a narrow Aperture opening, same scene, different orientation:


What I feel is that when you let more light in the camera is only able to record what is directly in front of it in the short time the shutter is open, leaving the stuff in the back to be present but not as sharp. When there is a more focused amount of light coming in the camera is able to "see" more without being overwhelmed. Aperture Priority (Av) is one of my favorite settings. There is a lot you can do with it and it can bring emotion to your photos depending on subject and lighting!


Saturday, July 17, 2010

White Out


Last night I was playing with a bunch of wildflowers that I picked and put in a blue glass vase. I love the vibrant yellow with the cobalt blue, but how it looked on my table in the photo just wasn't doing it for me. The background is my messy kitchen (its clean now thanks to a few hours alone this morning yay!!) and the colors don't really pop. Also the vase, which is simple and beautiful, doesn't get the full attention it deserves.


It was late afternoon and the sun was on the other side of the house. I am sure it doesn't really matter for this trick as long as there is daylight at all. What I did was arrange the vase and
flower so that I would be facing the large sliding glass door with my camera. I pulled my gauzy curtains shut (probably does not matter if you have them but I think it helped a little) and removed any objects that were in front of the door. I put my camera on Manual. Next, I opened up my aperture as wide as it would go on my 18-55 mm lens. I set the shutter speed to 1/13 of a second and my ISO at 400. Here is the result:

Simple, elegant, and I think would make a great print! I think I will get one made. I have done nothing to this photo except retouch a couple of shadows on the edge. I may further retouch to remove the slight shadow on the right hand side, but as far as the lighting effect here that was all camera!

Play around with flowers and lighting! You can get some really neat results!

Wednesday, July 14, 2010

Soften Up


Sometimes you just want a photo to focus on one thing, and have everything else kind of fade into the background. This can be achieved in two ways. The above photo was processed using Picasa. I opened the photo, clicked on the Effects tab, and chose "Soft Focus". This creates a central focal "circle" that you can adjust to widen or constrict. There is also a slider bar to adjust the amount of blur you are giving edges. I usually widen it and reduce blur so that it looks more natural. It depends on the kind of photo it is.


The photo above in this case represents a use of the settings on my camera. I switched the dial to Av (Aperture priority) and opened up the Aperture as wide as it would go, in this case I believe it was set at 4.0. The camera automatically selects a shutter speed to go along with the lighting. I got as close to the flower as my camera would allow (using the 55-85 mm lens) and this is the result. The background is nice and blurry, an effect called "bokeh" in the photography world, and the tulip and dew drops are nice and crisp. Very pleasing to the eye!

Sunday, June 27, 2010

Movement and Lighting Problems


Recently I have been trying to take lots of photos of moving people, trying to capture moment and mood. It can be very difficult as you have to have a fast shutter speed to "freeze" time. This is no big deal if you are outside, where light is plenty, but if you are indoors and the lighting is dim or yellowy then you may find your photos are coming out really dark or everyone looks jaundiced.

My main subject lately has been my daughter and her ballet class. I did not want to use a flash for the recitals as this can blind the dancers and also distract them. Plus its just plain RUDE!!! And besides that, even with the flash your pics are going to come out washed out and glaring. Really its hard to win. I don't have a lot of equipment to work with so I have to make the best of what I have.

First, I make sure my camera is set to Manual, put the ISO up to 800 or so, and test out a few shutter speeds. Open the Aperture as wide as you can (the lower the number, the wider it is) for the lens you are using to let in the maximum amount of light. Your photos may still come out dark but they are somewhat fixable. Try to use a shutter speed of 1/60 at the minimum. It depends entirely on the setting though. You may need to play with a few different speeds.

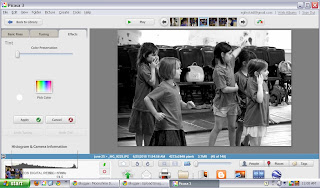
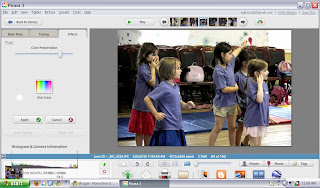
Next, after I have taken as many as I want, I will upload them to the free Picasa program that I know and love. In here I will take the ones that I want to fix, double click to enlarge the first one, and go to the Tuning tab.

Bring up Highlights about halfway, then Fill light a little bit, then Shadows a little.

This may fix the problem or it may seem to make your photo's coloring a little off. This is ok. Once you have adjusted the lighting, go to the Effects tab. Click on "Tint".


This will instantly turn your photo black and white. The more contrasted, the better.


Go to the "Color Preservation" slider bar and bring it up until it looks correct. Voila! That is usually it!!


If it looks too pasty to you still, you can either hit "Warmify" (which I find is a little too drastic) or go back to the Tuning tab and bring up the red value slightly which will enhance skin tones.

Sound complicated? Its really not once you have tried a few things. Don't be afraid to play with your photos. Everything can be undone!!

Tip: If you find that your photo is too grainy still after fixing the lighting and coloring, I suggest downloading Lightroom 3 in the 30 day trial (or buying it--its a great program and if you have a student in the house its only $99 which is a great deal) and using the Noise Reduction feature. In there you would bring up the Luminance bar which removes most of the problem. You may have to play with the Detail and Color bars directly under it but its very easy to navigate!

Friday, June 11, 2010

Lightroom--Vive l'difference

I have had the Lightroom 3 Beta download on my computer for about 3 months now. It intimidated the hell out of me so I never really did much. Then I took this picture the other day:


Looks pretty cool, right? I used Picasa and hit "I'm feeling lucky" on a close up of a rainbow that passed through the other day. I was excited that I could see the rain falling through the colors and that you could see the extra bands of coloring under the traditional ROYGBIV.

HOWEVER you will also notice that it is noisy as heck. "Noise" is the graininess you can see, the little dots of brighter colors that make it look kind of like a close up of a cartoon in the newspaper. Not pretty. If you are picky about your photos like I am, this will bother you no matter how cool it looks!!!

Lightroom (from Adobe) has this cool feature called Noise Reduction. I had heard about it but was too scared to figure it out. Never be scared of a computer program in this day and age. There are so many help files and tutorials out there that anyone can do anything if they just take the time to read the how to!!!

Here is the same photo using noise reduction:

I was very happy with this result. There are still some issues that cannot be completely resolved using just the noise reduction, but it looks many times better and preserved the 2 things I liked about the image in the first place: the rain drops and all the colors!

Lightroom 3 is now available to purchase so the beta is no longer available. I am not sure if at some point its going to die on me completely, but the good thing about software is that they are always working on the next version and that one will be in beta also! Visit the Adobe website to purchase this wonderful program! If you have a student at home, the cost is drastically reduced so check that out for sure!!

Monday, June 7, 2010

Finding Peace

St. Anne's Cemetery
Milton, VT

This summer I am hoping to drive around Vermont to different rural cemeteries and try to capture the peaceful feelings that usually come with them. The above cemetery is right down the street for my house and I spend a lot of time in there and have a ton of photos from my wanderings. There are some beautiful stones and the crucifix always makes me stop and pray.