
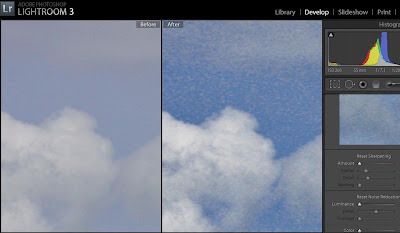
There are 2 kinds of noise: color noise and grain. Above in the "Before" section you can see tiny dots of purple and green and magenta in the blue sky. A great article explaining why this happens can be found here!
The "After" image shows a speckly looking sky. I have removed the color noise and upped the Luminance of the purple hue, but what is left is quite ugly! That is what I call "grain noise".

Above you can see that I have slid the Color bar over to about 30 (30% of the pixels). In LR3 you do not need to slide that particular bar over very far to get a good result. In fact if you slide it too far you may lose some of the color you want to keep! 30 usually is sufficient.
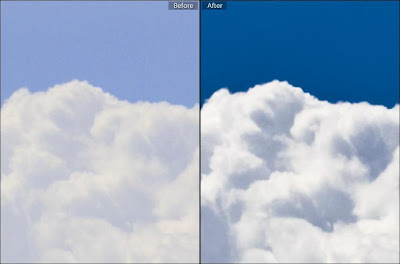
And here in the above photo is another example of noise that is present when trying to enhance the contrast of the image to make the clouds pop, but having unpleasant after effects.
So, what can we do about this grain noise? In LR3 there is a section under the Noise Reduction menu called Luminance. Luminance is what makes the skin on those models you see in magazines look flawless. It gives the photo enough blur to instill perfection without compromising the integrity of the original subject. However you do not want to be heavy handed with it as too much of a good thing can spoil the result.
Here is an example of a finished photo using both color noise and luminance noise reduction:
The after image also had gone through the same process as the ones earlier in this post. I had upped the contrast to about 60, darkened shadows, brightened highlights, and adjusted blue luminance (under the hue/saturation/luminance menu) which caused graininess. Using both the color and luminance noise reduction sliders I was able to obtain a smoother, more pleasing image.
Here is an example of a photo of a person (Ok, its me, and I can't believe I am putting my blotchy skin out there but its in the name of photography!!!) just so you can see the difference in something non-cloud (I tend to be obsessed with clouds so they become my main subjects!)
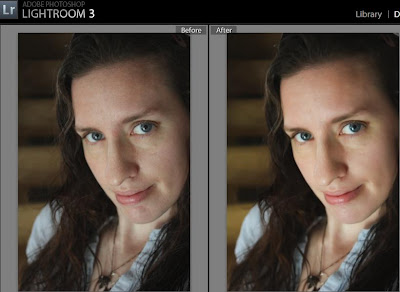
Here using the Luminance Noise Reduction set to about 50 you can see that the skin tone is much more even and blotchiness fades away. Any more would make it too blurry, and any less would leave too much grain. This photo was taken in a dark stairwell using the camera set on "No Flash" which is an auto setting. I like this setting for some things because it makes the most of available light and creates a warm feeling to the photo.

Here in this closeup you can see the purple/magenta/green dots on the left, as well as some blotchiness. Using these techniques can create a smoother complexion on a person without having to retouch every little spot.
I hope this was helpful to someone! The more I play with Lightroom the more I am learning. There are tons of forums and help files but I haven't got the attention span or the time to read them all. If I spent all my time reading that stuff I wouldn't have time to actually edit my photos!!!