
Saturday, July 16, 2011
Photo Contest!
Finally SOMETHING to do with my gazillion photos! Burlington Free Press is hosting a photo contest called "Capture My Vermont" with about 20 categories, and I have pics for ALL of them hehehehe Please vote for me if you don't mind! I think you can register from your Facebook account...

Thursday, March 10, 2011
Quiet Down!
One of the things that can ruin a great photo is noise. I hadn't heard the term until I got the DSLR and read some how-to's on dealing with a high ISO setting in dark lighting. Anytime you take a photo with a digital camera without the proper lighting you are going to encounter this problem. The only program I have found (doesn't mean there aren't others out there...) that deals specifically with this problem is Lightroom. Picasa doesn't have an algorithm to deal with it, and I assume it was probably time consuming to invent. SO you must pay but wow is it worth it! Below are some before and after shots of noise removal from photos of clouds, which let me just say are some very noisy subjects due to their...mushiness!

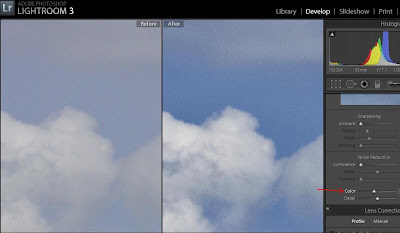


There are 2 kinds of noise: color noise and grain. Above in the "Before" section you can see tiny dots of purple and green and magenta in the blue sky. A great article explaining why this happens can be found here!
The "After" image shows a speckly looking sky. I have removed the color noise and upped the Luminance of the purple hue, but what is left is quite ugly! That is what I call "grain noise".

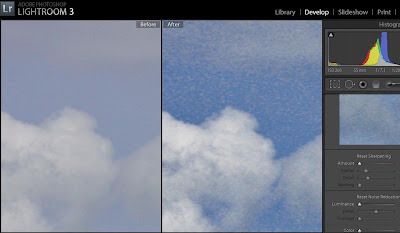
Above you can see that I have slid the Color bar over to about 30 (30% of the pixels). In LR3 you do not need to slide that particular bar over very far to get a good result. In fact if you slide it too far you may lose some of the color you want to keep! 30 usually is sufficient.
And here in the above photo is another example of noise that is present when trying to enhance the contrast of the image to make the clouds pop, but having unpleasant after effects.
So, what can we do about this grain noise? In LR3 there is a section under the Noise Reduction menu called Luminance. Luminance is what makes the skin on those models you see in magazines look flawless. It gives the photo enough blur to instill perfection without compromising the integrity of the original subject. However you do not want to be heavy handed with it as too much of a good thing can spoil the result.
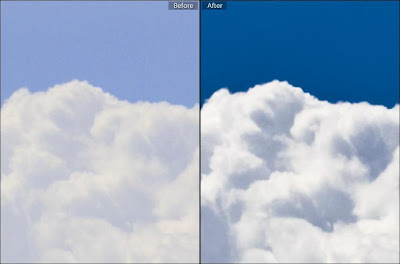
Here is an example of a finished photo using both color noise and luminance noise reduction:
The after image also had gone through the same process as the ones earlier in this post. I had upped the contrast to about 60, darkened shadows, brightened highlights, and adjusted blue luminance (under the hue/saturation/luminance menu) which caused graininess. Using both the color and luminance noise reduction sliders I was able to obtain a smoother, more pleasing image.
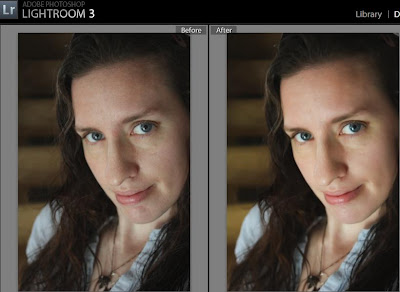
Here is an example of a photo of a person (Ok, its me, and I can't believe I am putting my blotchy skin out there but its in the name of photography!!!) just so you can see the difference in something non-cloud (I tend to be obsessed with clouds so they become my main subjects!)
Here using the Luminance Noise Reduction set to about 50 you can see that the skin tone is much more even and blotchiness fades away. Any more would make it too blurry, and any less would leave too much grain. This photo was taken in a dark stairwell using the camera set on "No Flash" which is an auto setting. I like this setting for some things because it makes the most of available light and creates a warm feeling to the photo.
Here in this closeup you can see the purple/magenta/green dots on the left, as well as some blotchiness. Using these techniques can create a smoother complexion on a person without having to retouch every little spot.
I hope this was helpful to someone! The more I play with Lightroom the more I am learning. There are tons of forums and help files but I haven't got the attention span or the time to read them all. If I spent all my time reading that stuff I wouldn't have time to actually edit my photos!!!
Monday, February 21, 2011
Mo-oooom! He's Copyin' Me!!!
OK so maybe I've been around the kids too much. Is there such a thing? Yes, yes there is ;) That's why we have Girls' Night.
Anyway I have recently been asked what is a good way to copy protect digital photos for use in Facebook and other social media albums. I am a fan of "easy" so I will demonstrate my favorite go-to copy protect: the watermark.
A watermark is simply strategically placed text on your image so that a person can still enjoy the photo but cannot pirate it for their own purposes without your explicit approval. Some people who are bigger time photographers that have a career in that field will put large but translucent watermarks on their work to ensure that no one will copy and then crop out or photoshop the watermark out of existence. Myself being smalltime currently I just kind of meekly stick it in the bottom corner most of the time. The choice is yours and you can easily try a few different techniques in Picasa.
The first step is to of course import your photos into Picasa. I use Picasa for all my importing needs to get the photos off the card and into the computer because I really like the user-interface's simplicity. Once I have my photos how I want them and in the final stage I export them as a smaller 1024 pixel file. These exports are the ones that I post on Facebook or use for blogs. They are easier to work with and ensure that no one ever gets my large file even if they copy it. You could use an even small format if you want. It doesn't really matter.
The export process in Picasa has an easy watermark field at the bottom which will place the same text you enter in the bottom right hand corner of each of your photos:

Here is how the photo will look when you click on Export:

(red box for illustration purposes--does not show up on photo)
It does the trick but someone could easily crop that out or clone over it if they really wanted to.
The method I have been using is to export the photo but do not check off "Add Watermark". Instead I then open the photo I want to mark and click on the Text box:
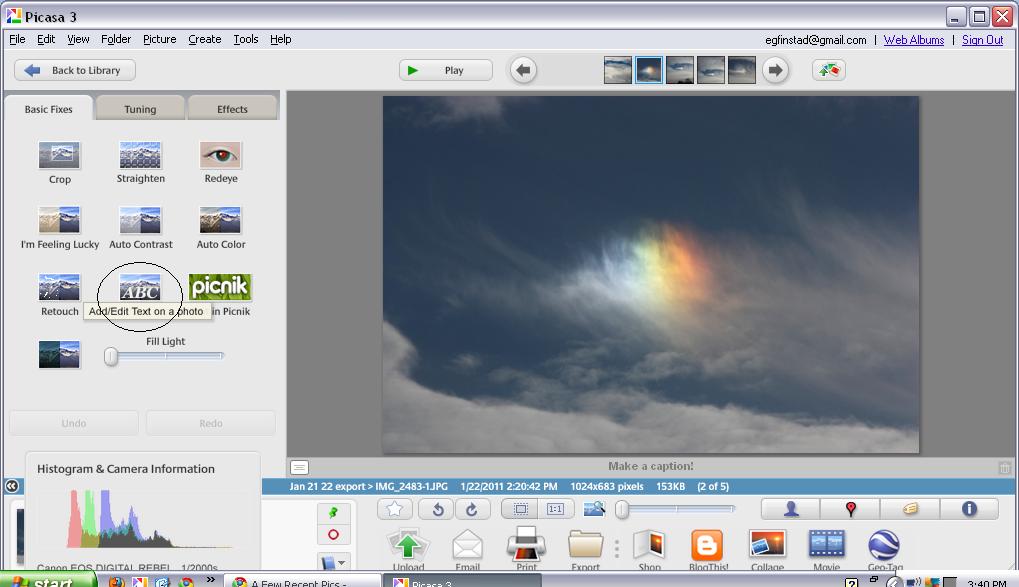
Click on image to enlarge
From here the photo will then say "Type anywhere to add text". You simply need to just start typing and a box will appear on the photo with your text in it. You can move this box anywhere on the screen. You can control the color, size, font, opacity (translucence), and placement:

Click to enlarge image
In my example the translucency is up all the way to allow for the color I chose to be seen easily. If you use a larger font size I recommend dropping the translucency half way down. Be sure to click "Apply" to keep the text on the screen.
The next step is to go back to the library screen and on the folder containing your files click on the Save icon:

Click to enlarge image
If you do not click on Save it will not keep your watermark on the photo when you go to upload it!

Final Watermarked Image
Here is some general info on Copyright laws:
Do you have any other suggestions or good articles about this topic? Please leave a comment below!
Monday, February 14, 2011
Gymnastics Birthday Party
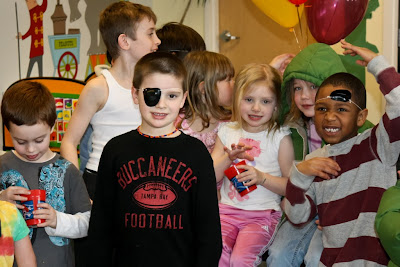
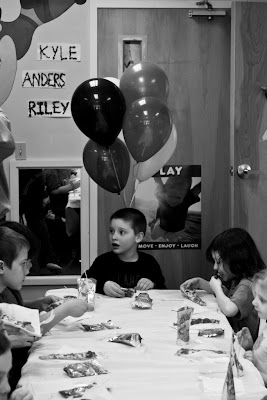
I am so lucky to have a great friend who lets me come along to her events and take pictures. Its wonderful practice for me and I get to spend time around some great kids. This past Sunday I got to attend her son's 6th birthday party (and my own older 2 kids got to go too and had a BLAST) at a place called Regal Gymnastics in Winooski, VT. The lighting was poor in the gymnastics area and my external flash has not been cooperating lately so I had to rely on the built-in flash which is so-so and also my "skillz" with the ISO/Aperture/Shutter/White Balance/Light Metering.

 Update: While working on the indoor shots in Lightroom I decided to click on the "HSL" section which is Hue, Saturation, and Luminance. Using these three groups of color controls combined with the Contrast slider I found I was able to produce MUCH more desirable results. Now I want to go back to some older pics and see if I can fix them also. Its such a learning process.
At first my flash was working just fine, but after taking about 20 pictures in a row and saving them in RAW format it suddenly started to say "BUSY DAMMIT" and wouldn't take pictures anymore. This is my worst nightmare. Luckily it was not something I was getting paid to do but I am a perfectionist and a control freak, remember? If I closed the flash and opened it again real quick it would work again but it kept happening. So with a sigh I turned the ISO up to 1600 (the highest my camera would go) and put the shutter at 1/100 and the f-stop at 5.6. This only really seems to spell one thing with me: NOISE. I don't know if I am doing something wrong or what. I had to have a fast shutter speed as it was GYMNASTICS and these were all 6-10 year olds high on sugar. Anything less than 1/100 was not worth taking.
At first I kept it in RAW and each photo looked fine on the screen. But when I started to run out of disk space I dropped it to JPG. In retrospect I wish I had just had it on JPG the entire time. I used Lightroom to edit and fixing the luminance/color noise does not look right when you export into a JPG file which is what I end up having to do. The ones I took in JPG were easier to edit and looked exactly the same when I exported them from my external drive to my hard drive for uploading purposes. I need to do some more research into why it is soooo grainy and if there really is no other alternative than to get a new external flash. The one I have is not fully compatible with my camera as it is an older Speedlite made for a SLR, not a DSLR.
Here are a few shots from the party:

 Update: While working on the indoor shots in Lightroom I decided to click on the "HSL" section which is Hue, Saturation, and Luminance. Using these three groups of color controls combined with the Contrast slider I found I was able to produce MUCH more desirable results. Now I want to go back to some older pics and see if I can fix them also. Its such a learning process.

Subscribe to:
Posts (Atom)